Wednesday 12 December 2012

Mac Address Spoofing / Changing

[Image: etherchange.jpg]
The MAC address (Media Access Control address or addresses of media access control) is basically a unique hexadecimal identifier that possess most of the equipment associated with networks.

An Ethernet MAC address is a six byte number, usually expressed as a twelve digit hexadecimal number (Example: 1AB4C234AB1F).ddress (Media Access Control address or addresses of media access control) is basically a unique hexadecimal identifier that possess most of the equipment associate

Changing Your MAC Address Or Mac Address spoofing :- 

Step 1.

The MAC Address in principle were designed so they can not be changed. However, there are many reasons (legal or not) to justify the fact that you want to change your MAC Address. One of these reasons, and perhaps the main one, is that ISPs, Cable Modem, more precisely, record and monitor your users by MAC Address, which often create certain disadvantages (e.g to share the Internet connection with other PCs).

Step 2.

There are several ways to modify and / or clone the MAC Address on Windows, including complex changes in the registry (regedit.exe), but the easiest one I found was to use a small application called EtherChange (runs on Windows 2000/XP/2003 / Vista).EtherChange After downloading, run the program and proceed to change or modify the MAC Address, If you are not able to run the program directly then another way to copy the program (etherchange) to drive in which operating system is installed. 

Example:- I copied Etherchange to C drive as window is installed in C, Now location of the etherchange is C:\etherchange ,Now go to Start-->Run-->cmd, Then in cmd(Command Prompt) go to path as C:\etherchange and enter ,then follow step 3 

Step 3.

Select the appropriate network adapter (network card). 
type 1 to specify a new ethernet address, or MAC Address. 
Enter new MAC Address without commas, dashes or any other separators. 

Clever! Now just restart your computer to enable the new MAC Address.

How to inbox people from anyones account.

:
 FACEBOOK Tricks:

How to send messages on facebook from someone's profile to some other.Some of you might know this already,but anyway here it is.

Step 1: First off you will need to pick 2 people from your friends list. One will be the inbox sender and one will be the reciever.
Lets say we picked John for the inbox sender and Mark for the reciever.

Step 2: Since John is sending the inbox we need to get his Facebook login email. Go to their profile and click on about.. wait.. what's this? Their login email is hidden? Well we're going to have to use something else to get their email.. hmm.. I got it!

Note: Their login email is not their @facebook.com email.

Step 3: Since their email may be hidden we need to use something else to get it. Go to Yahoo.com and login with Facebook. Once you have set it all up click import contacts from Facebook. Boom, you have almost everyone in your friend lists email address. Search for your inbox sender and copy his email address. Lets say John's email is John@yahoo.com

Step 4: Head on over to  This is a spoof email sender and can send an email to anyone as anyone. Where it says 'From name:' and 'From email:' put the senders email address. So it should look like
From name: John@yahoo.com
From email: John@yahoo.com

Step 5: Now you must find the receivers @facebook.com email to receive the fake email in their inbox. Head over to the receivers Facebook profile and click on about, and copy their @facebook.com email.
Lets say Mark's @facebook.com email is mark.mark@facebook.com

Step 6: Go back to the email sender and where it says 'To:' add the Facebook email address.
To: mark.mark@facebook.com

Step 7: Do not write anything in 'Subject:' just go down to 'Text:' and add what ever you want to send to the person.
The page should look like:

From name: John@yahoo.com
From email: John@yahoo.com
To: mark.mark@facebook.com
Subject:
Text: Hacked by -=_ Fida _=-

Now fill out the Captcha and click send.

 you have now sent an inbox from your friends account to your other friends account! You can also update statuses via this method by finding out what their upload email is, but that is for a different tutorial.

Remote Control ANY Mac On Your Wireless Network

Today I am going to show you how to Remote Control ANY mac on your wireless network, but before you start reading the rest of the tutorial there are a few basic requirements.

Requirements:
  • A Mac
  • Another Mac (the target)
  • Both Macs MUST be connected to the same wireless network.
  • You will need an Application called Chicken of the VNC installed on your Mac. You can download this 
Step 1: Assuming you have downloaded and Installed Chicken of the VNC, open it up. It is going to look something like this:
hack mac
Step 2: Now click on Connection and then click on New Connection. 

hack mac


After doing this you will get a window that looks like this: 

hack mac


Keep this window open! It will become important later on. 

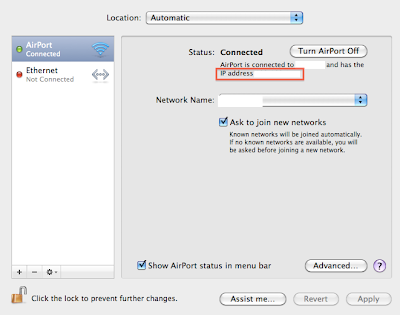
Step 3: Now, this is the part you need to pay close attention. You must now go to the target's Mac and get their IP Address. You can do this by opening system preferences and click Network under Internet and Wireless. 

hack mac


Now that you are in the target's Network settings you can find their IP. I have marked in red where you would see the IP Address. 

hack mac


Remember the IP Address. Write it down if you have too, just make sure you know it. 

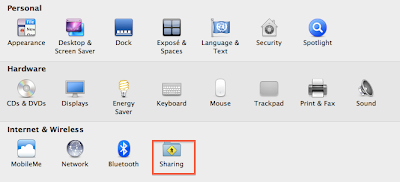
Step 4: You are not done with the target's settings yet. Exit Network settings and go to Sharing in the main system preferences window. 

hack mac


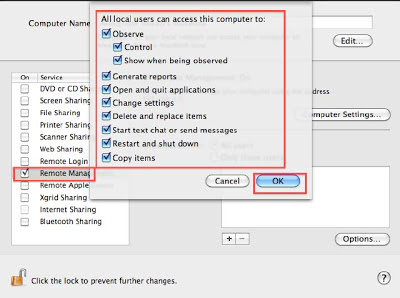
Now that you are in the Sharing settings check Remote Management and check everything you see. 

hack mac

Now that you are done with that click on Computer Settings. 

hack mac


Inside Computer Settings check VNC users may control may screen with this password. In the blank box type a password. REMEMBER THIS PASSWORD! It will become important later on in the tutorial. 

hack mac


When you are done click OK. 

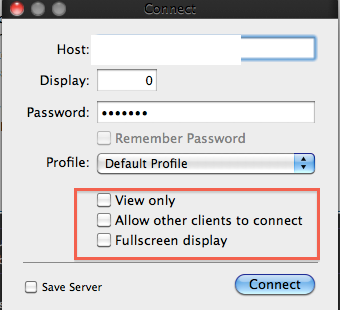
Step 5: You are now done with the target's computer. Return to your computer. In your computer you should have left the New Connection window open in Chicken of the VNC application. It is here where the IP Address and your Password become of great importance. Where it says Host type in the IP. Where it says password type in your Password. Below the Password UNCHECK all of those boxes. After doing that hit connect! 

hack mac


Step 6: After hitting Connect you will get a control window pop up on your desktop. Congratulations you now have FULL control of your Target's Mac. Have fun playing around with your Slave's Computer :) 

hack mac


Thats it... 

If you have any problem in connecting MAC on your Wireless Network, feel free to mention it in comments section. 

Enjoy.... 

Tuesday 11 December 2012

Miss call Finder


                                     Service Unavailable


Enter Number and Hit Search:

Updates:All the new 8 Series Mobile Numbers are now updated into the system.


Now you can find out the details about missed calls from series 8 mobile numbers too.

You can trace the Indian mobile number for the following operator/circiels.


Operator NameNetwork Name
Airtel BhartiAIRTEL Bharti Cellular (Andhra P)
Airtel BhartiAIRTEL Bharti Cellular (Chennai)
Airtel BhartiAIRTEL Bharti Cellular (Delhi)
Airtel BhartiAIRTEL Bharti Cellular (Gujarat)
Airtel BhartiAIRTEL Bharti Cellular (Haryana)
Airtel BhartiAIRTEL Bharti Cellular (Himachal P)
Airtel BhartiAIRTEL Bharti Cellular (Karnataka)
Airtel BhartiAIRTEL Bharti Cellular (Kerala)
Airtel BhartiAIRTEL Bharti Cellular (Kolkata)
Airtel BhartiAIRTEL Bharti Cellular (Madhya P)
Airtel BhartiAIRTEL Bharti Cellular (Maharastra)
Airtel BhartiAIRTEL Bharti Cellular (Mumbai)
Airtel BhartiAIRTEL Bharti Cellular (Punjab)
Airtel BhartiAIRTEL Bharti Cellular (Rajasthan)
Airtel BhartiAIRTEL Bharti Cellular (Tamilnadu)
Airtel BhartiAIRTEL Bharti Cellular (Upwest)
BPL Mobile Communications LtdBPL Mobile Cellular (Kerala)
BPL Mobile Communications LtdBPL Mobile Cellular (Maharastra)
BPL Mobile Communications LtdBPL Mobile Cellular (Tamilnadu)
BPL Mobile Communications LtdBPL Mobile Comm (Mumbai)
Bharat Sanchar Nigam LimitedBSNL (Andhra Pradesh)
BsnlBSNL (Andhra Pradesh)
Bharat Sanchar Nigam LimitedBSNL (Bihar)
Bharat Sanchar Nigam LimitedBSNL (Haryana)
Bharat Sanchar Nigam LimitedBSNL (Himachal Pradesh)
Bharat Sanchar Nigam LimitedBSNL (Karnataka)
Bharat Sanchar Nigam LimitedBSNL (Kerala)
Bharat Sanchar Nigam LimitedBSNL (Madhya Pradesh)
Bharat Sanchar Nigam LimitedBSNL (Orissa)
Bharat Sanchar Nigam LimitedBSNL (Rajasthan)
Bharat Sanchar Nigam LimitedBSNL (TamilNadu)
Bharat Sanchar Nigam LimitedBSNL (UP West)
Bharat Sanchar Nigam LimitedBSNL (West Bengal)
Fascel LimitedFascel Limited
Hutchison Essar TelecomHutchison Essar Telecom (Hutch)
Hutchison MAX Telecom(hutch)Hutchison MAX Telecom
IDEA Cellular LimitedIDEA Cellular (Gujarat)
IDEA Cellular LimitedIDEA Cellular(Maharastra)
IDEA Cellular LimitedIDEA Cellular(New Delhi)
Idea Mobile CommunicationsIDEA Mobile Comm (Haryana)
Idea Mobile CommunicationsIdea Mobile Comm(Kerala) (Escotel-Kerala)
Idea Mobile CommunicationsIdea Mobile Comm(Upwest) (Escotel-UP)
Mahanagar Telephone Nigam LtdMTNL Dolphin (Delhi)
Mahanagar Telephone Nigam LtdMTNL Dolphin (Mumbai)
Reliance India (CDMA)Reliance Telecom
RPG Cellular ServicesRPG Cellular Services
Spice Communications LimitedSpice Telecom (Karnataka)
Spice Communications LimitedSpice Telecom (Punjab)
Airtel BhartiAIRTEL
BSNL - J&KBSNL - J&K
BSNL - GUJARATBSNL - GUJARAT
BSNL - UP(E)BSNL - UP(E)
BSNL - MAHARASHTRABSNL - MAHARASHTRA
BSNL - CHENNAIBSNL - CHENNAI
BSNL - KOLKATABSNL - KOLKATA
BSNL-PUNJABBSNL-PUNJAB
Aircel Ltd-TamilnaduAircel Ltd-Tamilnadu
Airtel-Maharashtra, GoaAirtel-Maharashtra, Goa
IDEA Cellular Ltd. (Andhra Pradesh)IDEA Cellular Ltd. (Andhra Pradesh)
Hutchison Essar South Ltd. (Chennai)Hutchison Essar South Ltd. (Chennai)
Hutchison Essar South Ltd. (Karnataka)Hutchison Essar South Ltd. (Karnataka)
Hutchison Essar South Ltd. (Punjab)Hutchison Essar South Ltd. (Punjab)
Hutchison Essar South Ltd. (UP-West)Hutchison Essar South Ltd. (UP-West)
Hutchison Essar Telecom Ltd. (New Delhi)Hutchison Essar Telecom Ltd. (New Delhi)
Hutchison Telecom East Limited(Hutch-Kolkata)Hutchison Telecom East Ltd. (Kolkata)
Hutchison Essar South Ltd. (Andhra Pradesh)Hutchison Essar South Ltd. (Andhra Pradesh)
Reliance India (CDMA)Reliance India (CDMA)
Aircel Digilink India Ltd. (Haryana)-HUTCH(Haryana)Aircel Digilink India Ltd. (Haryana)-HUTCH(Haryana)
Aircel Digilink India Ltd. (Rajasthan)-HUTCH(Rajasthan)Aircel Digilink India Ltd. (Rajasthan)-HUTCH(Rajasthan)
Aircel Digilink India Ltd. (UP-East)-HUTCH(UP-East)Aircel Digilink India Ltd. (UP-East)-HUTCH(UP-East)
Fascel Ltd. (Gujarat)-HUTCH(Gujarat)Fascel Ltd. (Gujarat)-HUTCH(Gujarat)
Reliance Telecom Ltd. (Madhya Pradesh)Reliance Telecom Ltd.� (Madhya Pradesh)
Reliance Telecom Ltd. (Assam)Reliance Telecom Ltd. (Assam)
Reliance Telecom Ltd. (Bihar)Reliance Telecom Ltd. (Bihar)
Reliance Telecom Ltd. (Himachal Pradesh)Reliance Telecom Ltd. (Himachal Pradesh)
Reliance Telecom Ltd. (North East)Reliance Telecom Ltd. (North East)
Reliance Telecom Ltd. (Orissa)Reliance Telecom Ltd. (Orissa)
Reliance Telecom Ltd. (West Bengal)Reliance Telecom Ltd. (West Bengal)
IDEA Cellular Ltd. (Madhya Pradesh)IDEA Cellular Ltd. (Madhya Pradesh)
TATA Indicom CDMATATA Indicom CDMA
HutchHutch
BsnlBsnl
IDEA Cellular LimitedIdea
Airtel(Bihar)Airtel(Bihar)
Airtel BhartiAIRTEL Bharti Cellular (ORISSA)
RAINBOW (SHYAM TELELINKRAINBOW (SHYAM TELELINK
BSNL(Maharashtra)BSNL(Maharashtra)
DISHNETDISHNET

Monday 10 December 2012

Send free sms with any Sender Id or Number.

Friends I have a amazing trick. From which you Send Free sms Anywhere with Any Sender ID or Number.


                                                     USE THAT SITE :                                                 
                                                         

METHOD :

Please follow these steps for use.
2:Select a language  from top.
3:Register
4:After registration you will get one conformaton email.
5:visit on this site for login http://websms.lleida.net/index.html.

Thursday 6 December 2012

Photo Instrument tool


Glamour Skin
The effect of "Glamour Skin" based on the blurring of objects which have a size from R1 to R2, (R1<R2).
This skin smoothing technique makes skin appear smooth without losing the texture. You'll find this technique used in many magazines, ads, and other publications.
Here are example before and after effect of "Glamour Skin". As you can see, the skin looks a lot smoother but the texture of the skin is still visible. When looking at professional photography, you'll notice that the skin looks smooth without looking plastic. The skin texture that makes skin look natural is what marks the difference between an amateur and a professional retoucher.
Before
Settings of "Glamour Skin" for this example
You should take a brush to fill a skin only (without eye)
After


Object Removal
Sometimes the perfect photo can be spoiled by an unwanted object in the background. Maybe a person from the past is there as a constant reminder in your favorite family photo and you just want them removed. This tool provides the solution to your troubles.
Before
Take brush and fill an unwanted object
After few seconds


Another example:
Before
Take brush and fill an unwanted object
After few seconds
Instrument: Glamour Skin, Liquify
 Before 
After
Serial keys:
Email Address:iraq_att@cker.com Registration Key: 02-ABCDEFHG


OR

 Email Address: putin@mustdie.com
 Registration Key: 05-QSLVXPJK

 OR

 Email Address: super@gavno.net Registration Key: 07-HDGKJYQL

 OR

 Email Address: sosi@xyu.moi
 Registration Key: 06-XETXTNXH

Friday 30 November 2012

Windows Tips

 How To Hack The Windows 7 Or Vista Password Easily:
Follow the Below steps as given below-

1)First You Go to Start then select Run

2) Type 'Regedit' and click ok

3) Find 'HKEY_CURRENT_USER\Control Panel\Desktop\'

4) Select 'WaitToKillAppTimeout'

5) Right click and select 'Modify'

6) Change the value to '1000'

7) Click 'OK'

8) Now select 'HungAppTimeout'

9) Right click and select 'Modify'

10) Change the value to '1000'

11) Click 'OK'

How To Install Windows XP in 10 Minutes :
1. Insert The CD And Finish The Drive Format Step. Now Your Computer Will Restart.
2. Now You Will See The Below Screen.


3. Now Press Shift+F10, It will Open Command Prompt
4. In The Command Prompt Type “taskmgr”
5. Now Click At The Process Tab And Check The Process “Setup”
6. Right Click On “Setup“. Now Click “Set Priority” And Select “Real Time“. 
7. Now Close Task Manager And Command Prompt. Now Your OS installation will be finished within 10 Minutes.
8. Thats All.

 How To Hide Any Drive in Windows:
Most of you must have wondered if there exists a way without using software to Hide A Drive completely so that it cannot be viewed or accessed without unlocking it. so, here is a easiest method to hide drive simple 4 steps.


Follow The Steps For Do This..


1. Goto run type “gpedit.msc” (without quotes)
2. select user configuration —> administrative templates —> windows components —> windows explorer(click on it) 
3. On right panel search for hide theses specified drives in my computer.
4. Double click it mark on enable to hide the drive and select drive the which you want to hide. If u wanted to hide all the drives which are on your system then select restrict all drives.
to make it unhidden mark on disable option.

I hope this tips helps u!!

How To Make Computer Faster Using Notepad:
Below are steps that i suggest you should implement to make your pc faster as well as making it safe from threats


1. First You go to notepad

2. Then write this in mystring=(80000000) without asterisk

3. Now Save it on your desktop and name it ram.vbe. Now You close notepad and double click on ram.vbe nothing will open but your computer will get faster


 How to Enable a Remote Desktop Connection in Windows 7:

You can control your computer from a remote location with Windows 7's integrated Remote Desktop utility. When using Remote Desktop, you see and interact with the remote computer as if you were sitting in front of it. Music and sounds on the remote machine also play locally when connected. By default, Remote Desktop comes disabled. While any version of Windows 7 can connect to a Remote Desktop server, according to Microsoft, only Windows 7 Professional, Ultimate and Enterprise can act as Remote Desktop servers. If you are using Windows 7 Starter, Home Basic or Home Premium, you cannot host a Remote Desktop session; you may only connect to one

Instructions

Enable Remote Desktop
1_ Click the "Start Menu" button with your mouse or hit the Windows key on your keyboard.
2_Right-click on the item labeled "Computer" and then click on "Properties" at the bottom of the list. This brings you to a page with basic information about your computer.
3_Make a note of the "Computer name" under the right column of the basic information page listed under "Computer name, domain, and workgroup settings." You will need this if you want to connect over the local area network. If you want to connect over the Internet, refer to your router and its manual for your IP address and how to enable port forwarding to this computer for Remote Desktop's port 3389.
4_Click "Remote settings" on the left column of the basic information page. A window appears with two sections: "Remote Assistance" on the top section and "Remote Desktop" on the bottom section.
5_Choose either the second or the third option, titled "Allow connections from computers running any version of Remote Desktop (less secure)" or "Allow connections only from computers running Remote Desktop with Network Level Authentication (more secure)," respectively. The decision for more or less security is up to you.

Test the Connection

6_Switch to another Windows 7 computer connected to the network or the Internet.
7_Click the "Start Menu" button with your mouse or hit the Windows key on your keyboard.
8_Click "All Programs," then "Accessories" and then choose the program "Remote Desktop Connection." The Remote Desktop Connection client utility will then appear.
9_Type the computer name or IP address from the previous section into the Remote Desktop Connection client.
10_Hit the "Connect" button to connect to the remote computer.