Tuesday, 7 October 2014

How to Qmobile Noir A10 Jelly Bean 4.1.1 update

Jelly Bean Update 4.1.1

Jelly Bean Update
New Jelly Bean update for QMobile Noir A10 (14-03-2013)

Guys ! The Auto Rotate Issue Has Been Fixed in Jelly Bean Rom u Can Download it from the following link.
download :https://docs.google.com/file/d/0ByNS...it?usp=sharing

Update Features:

Auto Rotate Issue Fixed
Jelly Bean 4.1.1 ROM
Rooted
Deodexed
Very fast and smooth.

How to install:

DO AT YOUR OWN RISK!!!

1. Reboot into cwm recovery if don't have cwm then install it first.
2. Wipe data/factory reset.
3. Wipe cache.
4. In mounts and storage select format system.
5. In advanced menu wipe dalvick cache.
6. Once all the wiping is done, select install zip from sd-card and select mobile_a10_jellybean.zip

Once complete reboot and enjoy!!!

QMobile Noir A10

How To Root QMobile A10 Noir

First of all Lets start with the root process.

1. Download the following file.
http://www.mediafire.com/?lwhknfmnc25nbc6

2. Enable USB Debugging on your device to do that goto Settings>Development>USB Debugging
3. Connect your device to any laptop/PC and http://www.droidiser.com/2012/11/how...y-android.html
4. Unzip the root tool downloaded above.

5. Change the Mode of your device from USB Storage to Media Device to proceed further.

6. Run the Runme.bat file as shown below.
root android


7. A command prompt with green letters will come up on your screen.

8. Follow the onscreen instructions carefully. To start off, you willl need to type in a "1" and press enter.
Note: If you ever want to Unroot your QMobile A10, follow the above steps till you reach this one and then, instead of typing "1", type "x" and hit enter. Follow the instructions that appear on the command prompt after that.


9. Your device will reboot during the process after which Bin4ry will copy some files to your device.

10. When the green letters in the command prompt says Have Fun!, then... Have fun.
That means, your device is rooted now and you can enjoy Superuser permissions!

Install CWM Recovery on QMobile Noir A10
cwm recovery qmobile


1. Download cwm recovery from the given link cwm_Recovery_QMobile_Noir_A10

2. Extract it, rename it to recovery.img & transfer it to the root of your SD Card.

3. Download and install MobileUncle MTK Tools from Google Play Store and run it.

4. Select the option recovery update from the application and when it ask for path guide it to the location where u copied the downloaded recovery file.


5. It will install and upon successfull installation it will ask you to reboot into recovery, select OK to go to newly insalled cwm recovery to confirm the installation.

6. If anything goes wrong you can download and install Stock Recovery For QMobile Noir A10 by using the above mentioned process again to revert back all the changes.


GPS Fix For QMobile Noir A10 for faster Lock

1. First of all you need a rooted QMobile Noir A10.

2. Download the modified gps.conf file from Here.

3. Browse to system/etc using root explorer and mount the system as read / write using the button present on top right of screen.

4. You will find a file gps.conf already present in the folder. Rename that file to gps.conf.bak, it will act as a backup for the original file.

5. Unzip the file you downloaded in Step 2, and copy the extracted gps.conf file to system/etc.

6. Reboot your Qmobile Noir A10.

7. Download GPS Test from Google Play Store and test your GPS now. (activate your gps first)


You will notice the improvement in getting GPS Lock Now.....

Enjoy............

MTK Android Based Phone IMEI Write Tool


IMEI&SN Writer tool
100% Working & Tested with MT6572& MT6582


Steps: 
1,Please power off the phone 
2,Then plug in the USB cable
USB Bootup
Meta_DB Init Start: 
Meta_DB Init PASS 
Enter to ModemMeta Start: 
Enter to ModemMeta PASS 

Start Write IMEI:
WriteIMEI_1: 911202151313301
WriteIMEI is OK !!!
From ModemMeta to APMeta Start: 
From APMeta to ModemMeta PASS 

It is over !!
imei changer
Download :

Download:

SEO Tags:

imei changer
imei write tool
MTK andriod Database


Friday, 26 September 2014

How to remove "Write Protected Error From a USB or Memory Card"

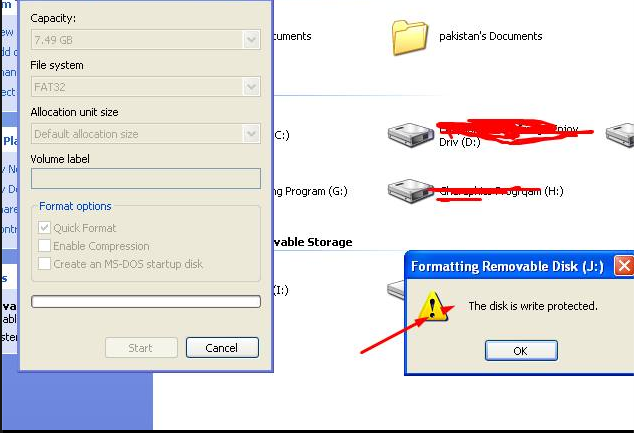
Probably these days we a getting write protected error while formatting USB flash drives like pen drives and memory cards. When this error occurs we cannot write or copy any data into our USB drives and even we cannot format these drives. So how to remove write protection error from pen drives or memory cards.


the disk is write protected
Here are some solutions to this problem.
Solution 1:
You must first unprotect the write protected pen drive to format it. Most USB flash drives contain a small switch around their casing. Carefully examine your dive for that switch and just move the switch to other end. Now connect your pen drive or memory stick to the computer and now you will be able to format the flash drive.
This case is helpful for the USB drives which have a switch, so how to remove a write protection from your USB memory stick if there is no write protection ON or OFF button on stick, then follow the below two solutions.

Solution 2: 
Connect the pen drive or memory stick to computer and check your pen drive’s drive letter, like whether it is E or F. Let us assume E as the dive letter for this solution.
1. Shutdown your PC.
2. Connect the USB flash drive.
3. Start the computer and press “F8” key. 
4. Advanced Boot Options screen will be displayed, Select Safe Mode with Command Prompt.
5. After loading into Safe Mode with Command Prompt, follow the below steps.
6. C:\windows\system32>E: (press enter, here E is our flash drive’s drive letter) 
7. G:\>format F: (press enter) 
8. If it asks (Y/N) then press (Y) and hit enter.
9. Now the formatting starts and removes write protection from USB drive.

Solution 3:
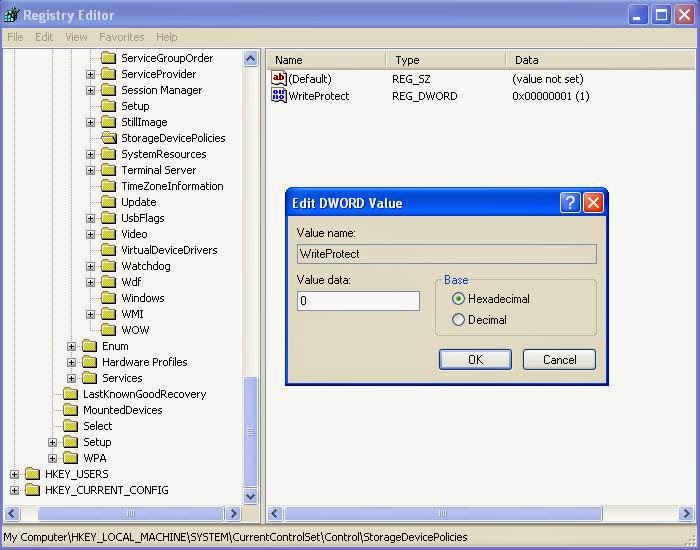
By configuring settings in Windows Registry you can enable or disable write protection of USB flash drives.
1. Go to run, type regedit and press enter. Or just use the short cut ‘Windows + r’ for opening windows registry.
2. Navigate to the below registry key location,
HKEY_LOCAL_MACHINE\SYSTEM\CurrentControlSet\Control\StorageDevicePolicies
Note: If “StorageDevicePolicies” does not exist, then you need to create it. Right click on the control, select new>key and create “StorageDevicePolicies”. Then select it and right-click in the right window. Now select New > Dword (32-bit) Value and name it as “WriteProtect”.
3. Double click on WriteProtect and set Value Data to 0 (zero) and press OK. [This will disable the write protection]

sd card protected
4. Now close the registry and restart your pc.
5. Now check you USB drive.
You can enable the write protection again by changing the value from 0 to 1. A value of 0 disables write protection and value 1 enables write protection.

*Note: If none of the above mentioned solutions seems to work with your flash drive then there might be a hardware issue. Try contacting you drives vendor.

Thursday, 25 September 2014

How to Downgrade iOS 7.1.2 To iOS 6.1.2


downgrade ios 7.1.2 to ios 6.1.2
 For those of you that have been waiting for a downgrade without the need for SHSH Blobs, the wait is over. Brought to you by @blackgeektuto, he has developed "GeekGrade"  which gives you the ability to downgrade your iPhone 4 (GSM, CDMA, and Rev A) and your iPod Touch 4 Generation, but is tethered. 

NOTE: PLEASE READ

  • This is a TETHERED downgrade, which simply means that every time you turn off your device, you will need to boot tether it so it can boot up. You can boot tether your device with a programs such as: redsn0w or GeekSn0w.
  • Before performing this downgrade it is highly advised to do a clean restore to the latest iOS version available. By doing this downgrade will lose all the data stored on your device, because the backup can not be restored to an older firmware.
  • I do not, nor does the developer, take any responsibility for misfortune while using GeekGrade with your device!

Downloads You Need:


Step By Step Guide:


  • Go into the Music folder and you'll see that inside there will be another folder called "iTunes" rename the folder "iTunes" to "iTunes_orig",
  • Now you'll need to uninstall your current iTunes program.
  • Once it's done you can install iTunes 11.0, which you have download from the above selection, by right click on it and selecting "Run as administrator"
  • Go through the setup wizard
  • When done, connect your iPhone, iPad, or iPod Touch to your computer and put it in DFU Mode
  • Open iREB by right clicking on the mouse ​​and select "Run as administrator"
  • Select the model of your device and iREB will do the rest
  • After a few seconds iREB should successfully place your device in Pwned DFU Mode
  • Close iREB ​​and open iTunes 11.0, which will read your device in recovery mode
  • Ignore it, while holding down the "shift" key, on the keyboard, click on "Restore". Select your Custom GeekGrade IPSW you downloaded and click "Open"
  • Afer about 10 minutes your device should look like it's in Recovery Mode (Picture of iTunes and the cable)To exit recovery mode you'll need to boot tether your device with redsn0w's option "Just Boot". (Keep these following steps on mind, every time you power down the device you will need to repeat them.)
  • Right click on Redsn0w and select "Run as administrator," click "Extras," and then "Select IPSW". select the Boot_IPSW you downloaded and click on "Open"
  • Now just click on the first button at the top "Just Boot". Redsn0w will ask immediately to put our device in DFU Mode.
  • The process is finished, now the iPhone, iPod, or iPad will boot into the choosen iOS, and your device has downgraded!

Downgrade iPhone 4 & iPod Touch 4

GeekGrade IPSW Download (Downgrade iPhone 4 & iPod Touch 4 Without SHSH Blobs Tethered) 

Downgrade iPhone 4 & iPod Touch 4
Down below you can find the custom IPSW's, created by BlackGeek (@BlackGeekTuto), 
to be use to downgrade all iPhone 4 models and the iPod Touch 4 Generation. 
All links are provided by the developer himself.

IMPORTANT: You have to download the GeekGrade_IPSW as well as the Boot_IPSW too

Supported devices:
  • iPhone 4
  • iPhone 3GS (not publicly)
  • iPod Touch 4G
  • iPod Touch 3G (not publicly)
  • iPad 1


iPhone 4 GSM (3,1):

iPhone 4 GSM Rev A (3,2):

iPhone 4 CDMA (3,3):

iPod Touch 4G:

iPad 1 (1,1)

Win iPhone 6 and iPhone 6 Plus together

New contest with Engadget and this time can be for one person to win Balhatvin iPhone 6 and iPhone 6 Plus, which already we have made ​​a comprehensive review of chanting from here and Alec conditions:
  • The competition is open to all Mtabaana in Engadget provided that it is in your FedEx or Aramex
  • IPhone Version 6 with a capacity of 16, while the iPhone 6 Plus with a capacity of 64 GB, both painted gray
  • Subscribe to our channel Engadget from here and re-deploy video on our review of the chanting from here through social sites
  • Remind us why you want these two phones and writing commentary from the news of the contest is not the same elsewhere.
  • The winner will be announced on 4 October, God willing